- Home
- Papercraft Adhesives
- How to use Brayers
Crafting-With-Brayers
Written and Created by PaperCraftCentral Susan
Would you like to try Crafting-With-Brayers but are not sure where to start?
I can tell you how to make a beautiful water scene to get you started. The instructions are below.
Crafting-With-Brayers to make a seascape

Crafting-With-Brayers (they're also known as art rollers) is a fun way to make unique card and scrapbook page backgrounds that your non-crafting friends and family might very well find stunning! You need never tell them how easy it is to make these types of lovely landscapes if you don't want to.
I'll show
you how I used a brayer to make a landscape of the sunlit sea with the silhouette of a
ship gliding by below. Once you know how easy it is to do, you'll probably want to try this technique.
But what is a brayer, I hear some of you asking? You can learn more about using them and also about a couple of other interesting stamping techniques you can use with them first, then come back to try out the landscaping technique shown on this page if you like. Or just start here and try the other techniques later!
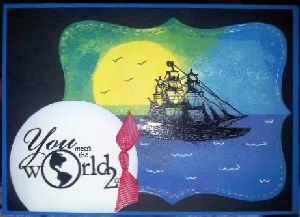
But first, here's a beautiful seascape card made by my friend Shirley. She followed directions I gave her in a little class we did about using brayers in this way and came up with a lovely card, don't you think? She is a wonderful crafter though so I am sure she also used her own artistic eye!

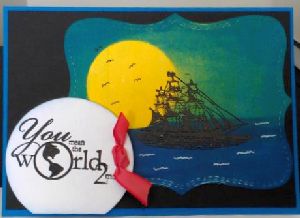
Here's another wonderful card using the same techniques and supplies, this time as made by my friend Trish. She is also a lovely crafter and allowed me to borrow her skills to see how well my instructions worked.
I think her ship looks like it is riding in a storm or foggy weather. Her touch is uniquely different to mine, as is yours. Her imagination is also unique, as is yours, What she wanted for her card was a little different than what I wanted for mine:

See how differently my friend's card turned out, using the same ink pads, instructions, stamps and brayers? You will no doubt put your uniqueness into your own cards when you start making landscapes with brayers too.
Now let's get to the instructions.
Instructions for using Brayers on this card:
First, gather the following:
- A range of blue inks, from light to dark (I used Bashful Blue now retired, Baja Breeze now retired, Marina Mist now retired, and Night of Navy) and a shade of bright yellow ink (I used Daffodil Delight)
- Brayer or brayers. I used one per ink colour during class, but you can use just one at home. Clean the barrels off between using each ink colour with a damp paper towel, an alcohol free baby wipe, or by running them under some water in a sink, then drying them off with a soft towel that won't leave lint behind between uses
- Stamps of choice (I used the ship from The Open Sea stamp set that retired in June 2016), Versamark ink, black embossing powder and my heat tool
- Paper Punches/Big Shot dies, a sentiment stamp, and any other embellishments of choice. I used a piece of Real Red Taffeta ribbon and some silver brads, and also the Top Note die (retired), the 1 3/4", the 1/4" and the 2 1/2" circle punches
- Cardstock. I used Basic White for my main image and sentiment, then Basic Black and Marina Mist (retired) for the card base. You will also need an ordinary piece of printer paper and some tape or repositionable glue such as Dotto
- White gel pen and Basic Black journaling pen
NOTE: Substitute any supplies you do not have such as ink colours and stamp sets for what you DO have in your own stash. This technique works whether you have exact supplies or not. Choose colours that say 'water' to you and a stamp that says 'things that should be on water'.
Here's What To Do:
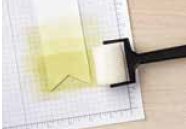
First, make your Top Note or other main image shape and adhere it to a piece of printer paper with the repositionable glue or the tape. Ink up your brayer with Daffodil Delight and lay colour down on the left hand side of the paper.
Punch
out a 1 3/4" circle from the printer paper and temporarily adhere it to
your cardstock where you want the sun to be. Use repositionable glue,
or you can actually use a circle punched from a Post It note with the stickiness still attached instead if you have them.
Now
using a clean brayer, ink it up with your lightest blue and roll it
over most of the background, including over the yellow ink.
Next take your second darkest blue and add some to the edges of your sky and water. Take a deeper 'bite' so the colour spreads across about 1/3 of the background all around.
Next, leaving your sun masked, lay a piece of printer paper across the sky to cover it up, leaving a straight line to form your horizon. Tape it down to the background printer paper so it won't move while you ink up the horizon.
Choose your darkest colour of blue and drag the brayer down vertically, just adding enough colour to make a thickish line (don't cover up the pretty blues in the ocean entirely though).
Add some more dark blue to the bottom of your sea and to the edges of it.
Now remove just the sun mask, leaving the horizon mask in place. Use your second darkest colour to blend the yellow of the sun into the water.
Remove the horizon mask, adjust the sky with more ink colours if you wish
WARNING: Avoid running over your now exposed yellow sun with a new colour of ink!
Then stamp your ship in Versamark and emboss it in black. Add flying birds with the black journaling pen by hand, then add whitecap squiggles with your white gel pen.
There. I hope you have now made a lovely seascape by Crafting-With-Brayers . And if you have, please show me below:
Do You Have A Favourite Handmade Card to Share?
Do you make greeting cards? Please do share it with me.
If you liked this project, you can see a few more ideas for how to use brayers in your crafting here.


New! Comments
Have your say about what you just read! Leave me a comment in the box below.