- Home
- Papercraft Adhesives
- Pet Scrapbook Ideas
Dog-Scrapbook-Ideas
Written and Created by PaperCraftCentral Susan
If you have a new puppy (or kitten or another type of animal), you may like to have some Dog-Scrapbook-Ideas for making a page or a book about him or her.
"Whoever says you can't buy happiness forgot little puppies"
~Gene Hill
Having some Dog-Scrapbook-Ideas for a page just about your pet makes perfect sense if you are a
scrapbooker and have the delight of owning a small puppy or kitten, or even an Iguana (wait, would that be legal?)
I got this little cute puppy a few years ago and I can tell you I have hardly put away my camera since he bounced into my life. I have some wonderful shots of him romping, looking winsome, being playful, and doing all those endearing things puppies do. Photos of him with my grandchildren are extra sweet.
I sure can tell some stories about all his antics! That will take care of the journaling I want to do in this album.
There's more about a particular part of this project below.

Practical Reasons for Keeping Pet Journals
You can turn your Dog-Scrapbook-Ideas into a usueful journal about your pet's growth, habits, statitsics like weight, length and rate of growth. This can be helpfl for you in caring for your pet and in reporting changes to a Vet, for example.
I found some pet journaling information for you should you want to set up a book that has a more serious purpose.
It's still nice to have the materials and tools ot decorate your book, no matter the reason for keeping one.
Purely Craft Reasons for Creating a Pet Scrapbook
You can scrap about your pets when you are taking part in swaps with other crafters.
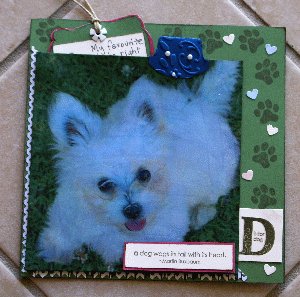
When a friend asked for a page for her Circle Journal showing my favourite photo, I had a little trouble choosing the one I liked best of my puppy.
On the other hand, when I finally chose it I had very little trouble making up the 6" x 6" page shown above.
Why not start a swap with fellow crafters of your own? You could ask for friends ot swap pages with stories and pictres of their pets and compile themm into a friend's scrapbook album, for example. It's a great excuse to scrap, and stay in touch with friends' news as well.
How I made my Dog-Scrapbook-Ideas into a page
For the Circle Journal page, I did not use a photograph. I used a computer generated printout of my puppy. I printed it on cardstock! This made it quite strong but I wanted it stronger.
Next I cut a piece of light cardboard from a cereal box to use as a mount for the picture, then I added a layer of cardstock that I had stamped some images on.
You can see I used the pawprint and the letter 'D' from the no longer available Stampin' Up! set 'D is for Dog'.
I thought it would be fun to form a border around two sides of my page, and I made a separate tag to journal about why this was my favourite photo and then hid it behind the picture itself.
Then I coated the board and cardstock in a thin layer of Mod Podge with a foam brush.
I smoothed my picture onto the board using some waxed paper to make sure there were no air bubbles or wrinkles in it. You could also use baking paper.
Then I added another thin layer of Mod Podge to the entire picture and over the exposed edges of the board, including the edges of the board. I did leave the top of my printed picture free of sealant so I could create a pocket for my journaling tag, but if you decide to add a ocket behind a loose element later and have sealed the edges, you can carefully release it with some craft knife cuts.
Don't worry when the clear drying Mod Podge looks milky and white when it is wet. It will dry clear if you have chosen a clear drying Mod Podge. Some of them do not dry clear, as they are designed to have a Satin finish, for example.
I set my wet picture aside to dry for about 30 minutes, though the humidity in the day meant I left it a little longer to make sure it was really dry.
NOTE: Do not try using your heat tool to dry the Mod Podge. It causes bubbling. Ask me how I know. He he.
Using this method, I managed to add a little texture to the picture as well, since the Mod Podge dried in tiny, raised lines. It looked as though I may have painted it instead of printing it.
For a project like this you could actually use acrylic paint and a paintbrush to add more texture. You can still paint over the dry acrylic paint with Mod Podge as a sealant if you wish.
It is important to let each layer of paint or podge dry completely before adding another one.
Next I went on to add more decorative elements to my page. I used ribbon, rick-rack and a silk flower, as well as more cardstock for my tag.
The little white hearts were punched cardstock shapes. I left them unsealed so they looked a bit more three dimensional.
The finished piece had a sturdiness to it that a normal scrabook page made with cardstock and designer series paper might not, though it does depend how many layers you wind up using for your page.
Remember if you are a cardmaker, your stamps and embellishments will be useful for decorating, journaling and adding titles to your scrapbook pages. I love that our supplies can be used for both cardmaking and scrapbooking.
f you have made a scrapbook page of your pet, I would love to see it. You can share it with me and I can publish it on papercraftcentral.com as inspiration for me and for others. Plus, I just love seeing pictures of pets.
Maybe you have birds, fish, horses, dogs or cats, or a combination. I'd love to see how you scrap your pets!
Share your Dog-Scrapbook-Ideas or ideas for scrapping about other pets below.
Do You Have Scrapbook Page to Share?
Please do share your scrapbook layouts and projects below.
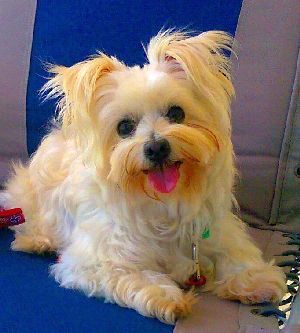
PS: Here is how my grown up puppy looked. I still think he was adorable!

Return from Dog Scrapbook to Scrapbooking | Return to PaperCarftCentral Home Page


New! Comments
Have your say about what you just read! Leave me a comment in the box below.