- Home
- Papercraft Adhesives
- Removing Adhesives
Adhesive Removal
Written and Created by PaperCraftCentral Susan
Adhesive removal can be a lifesaver for papercraft projects and maybe even for your photos. It's important to know how to use this little tool properly though as misuse of it can cause more damage to your photos and projects. Never fear! There are tips for this below.
"An architect's most useful tools are an eraser at the drafting board, and a wrecking ball at the site"
~Frank Lloyd Wright

What does this little piece of plastick-y stuff have to do with paper crafting?
Meet the Adhesive Removal Tool
Have you ever tried an Adhesive Removal tool? It can also be called an Art Gum Eraser.
Let me ask you something else as well: Have you ever had one of those days where everything you stuck down wasn't in the right place?
I sure have and it can be very upsetting when there is still some residue left on my project from the adhesive I used. It looks gummy and it is. It can also look dirty. Ugh.
One brilliant solution to this problem of sticking things down too soon is to use Dotto or Repositionable Glue Dots on your projects while you are planning them out. Dotto gives just enough tackiness to keep something in place long enough for you to decide if you want it there permanently, yet it allows you to move your item over and over again without fixing itself fast to the cardstock or designer paper.
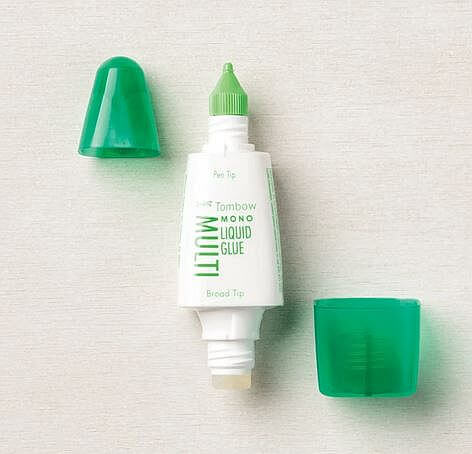
Another glue you can use is Liquid Multipurpose Tombow Glue. It's a great adhesive that allows you to have a little time to wiggle things in place before the two surfaces really grab hold, but did you know that this glue is also designed as a removable glue? Just add a little Tombow to one surface, allow it to dry thorough;y, and then it acts like adhesive on a Sticky Note. It can be removed from another surface easily. I even use this trick when I am positioning elements on my desk or in my Stamparatus to keep them in place while I work on them.

If you have a Silicone Craft Sheet,
this tool is also designed to help you hold things in place while you
work on them. You can use any type of adhesive to glue something to the
sheet, allow it to dry, then work on that piece. Once you are finished,
the glue and the element will allow itself to be peeled off the silicone
sheet. It's brilliant for constructing many layered paper flowers, for example.
What if you have used Stampin' Seal or Tearin' Tape on your project instead though, and you have to move it after all?
First, use a thin bladed item such as a finely made spatula tool from the Take Your Pick Tool, or find an envelope opener or knife to remove the two bits of stuck cardstock or paper from each other with the minimum of damage. Ease off the wrongly stuck stuff and see if you can get all of the residue from the tape to come with it.
Some adhesive is heat activated so cautiously try using a hair dryer or a heat tool on it if you cannot get it apart by manual means.
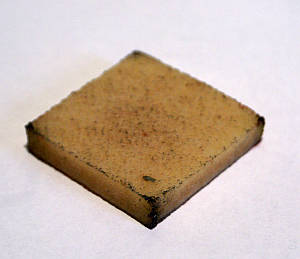
Is there is still a bit of the sticky stuff left on the project after you have separated it, take out your Adhesive Remover tool. It looks just like a humble lump of square resin but it is in fact a lifesaver in a situation like this.
First, do not use the tool as you would use an eraser. by rubbing it back and forth on your project. It could dig a hole in the paper! Instead, use the corner of the eraser and press it firmly onto the leftover stickiness. Now carefully roll and lift the tool off the paper. The stickiness (or part thereof) should now be on the resin. Keep gently using this rolling motion to get all of the offending residue off the cardstock.
CAUTION: Again, do not use this tool as an eraser. Your action while using it is rolling and lifting, not rubbing.
When you have picked up some of the unwanted residue, roll or pull the sticky stuff from the resin and discard it, and if there are any more bits that need to be removed from your project, apply the tool again, rolling and lifting the unwanted stuff off.
This tool is really best to be used with Stampin' Seal.
I have personally found it to be effective with removing unwanted
residue from photographs as well at times. You can even try it when
removing that tacky stuff left from old 'magnetic' photo albums. It
could work, and you will have saved your photographs in the process.Take
care when using it on old photos as they are easily damaged.
If your eraser grows sticky bits, trim them off with your paper snips and start afresh.
Another thing that helps me is to use the Embossing Buddy to powder the glue I want to remove. The powder helps the tool pick the adhesive up. If you have any extra powder left on your project, gently drag the adhesive remover tool across it after you have removed all the unwanted glue, and the tool will pick up the excess powder. Clean your tool of powder as above.
By the way, the first photo on this page shows my own personal Adhesive Remover tool. I use
it a lot and have had it since around 2006, as you can probably tell from the state of it! Lol!It has lasted well!
Now I hope you know a little more about the technique of adhesive removal.If you still have questions, maybe I can help. Ask me.


New! Comments
Have your say about what you just read! Leave me a comment in the box below.