- Home
- Papercraft Adhesives
- Banner Card
Banner Card
Written and Created by PaperCraftCentral Susan

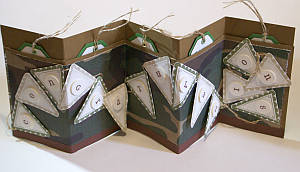
Banner cards literally make a statement, don't they? When I had a reason to make a special graduation card for someone, I decided to make it fit the occasion, because I can That's the beauty of having your own papercraft supplies. You can always customise your handmade greeting cards to fit the preferences of the ones you make for, and for the occasions that keep happening in your life.
I decided to use an accordion fold so the bunting sentiment could be draped across the entire length of the card.
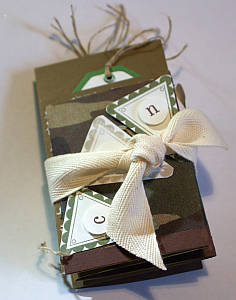
Then I put the whole card in a custom-made box so the recipient could have the fun of pulling out the surprise.
You don't usually get a banner as a birthday or bon voyage card, do you.
Here's How I Made my Banner Card:
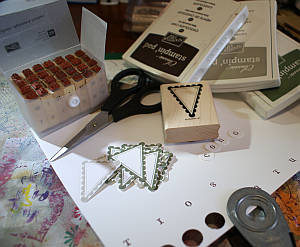
You will need to gather your supplies. I used the following from Stampin' Up! (some colours may now be retired but you can always substitute your own colours, right?):
- Always Artichoke, Crumb Cake, Very Vanilla and Old Olive cardstock
- Always Artichoke, Crumb Cake, Very Vanilla, Soft Suede and Old Olive ink
- Tag punches
- Linen thread
- Eyelets (non Stampin' Up!) and Crop-A-Dile
- 1/4" Circle Punch
- Calendar Alphabet and Numbers Stamp set
- Petite Pennants Builder Punch and Pennant Parade stamp set
- A length of natural coloured seam binding
Here's how I made the card:
Having the right supplies makes everything so easy, doesn't it? I love how Stampin' Up! products coordinate so well and are so wonderfully proportioned for making cards and scrapbook pages.
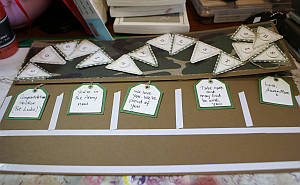
I started with cutting an A4 sheet of Old Olive cardstock in half lengthwise. Then I cut a piece of Always Artichoke (retired) to fit across the bottom and allow me to make a pocket at the top for my tags.

Next I made my accordion folds. I divided the length of my cardstock by 5 and made a crease at each of those intervals. I sponged my card base with ink as I saw fit.
Then I worked out my sentiment and punched out enough pennant pieces to fit them on. I wanted to write 'congratulations' so I needed 15 pennant pieces. I stamped out my word and punched out each letter with the 1/4" circle punch, then adhered the letters to the pennants.
I used some linen thread to make the banner and eased the pennant pieces into the accordion folds where it seemed they should fit, then adhered them down on the card front with Stampin' Dimensionals.
I wanted to make some private messages for the recipient so I made little tags with messages on them to pop inside the pockets as shown. I added eyelets and more linen thread to act as pullers for the tags.

The banner card easily stands up on its own for display and it fits perfectly into the footlocker box I made instead of an envelope.
The card is tied together with a length of natural coloured seam binding as shown below so it would fit neatly in the box and not force it to pop open unexpectedly.
Make the box to fit your card, not the other way around, is my advice.

Now you know how to make your own banner card for your next special occasion. Make one for a special birthday, or for a bon voyage, or to congratulate someone on their achievement.
There are so many ways to use this idea I hope you have fun with it.


New! Comments
Have your say about what you just read! Leave me a comment in the box below.