- Home
- Papercraft Adhesives
- The Black Magic Technique
Black Magic Card or Chalkboard Card
Written and Created by PaperCraftCentral Susan
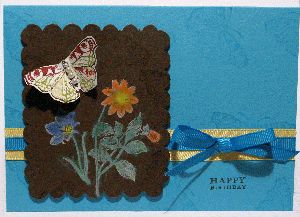
Make a black magic card (also called a chalkboard card) to create a dramatic tone for your next handmade greeting card.
I made this sample up to show at one Brisbane Papercraft Expo and now I can share it with you.

How to Make a Black Magic Card:
I also call this technique the Blackboard technique because it creates a chalkboard like finish for your card, a bit like the drawings we used to make in primary school before whiteboards and whiteboard markers came along. (Oh dear I am revealing too much about my age! Lol!)
You will need:
Here's what I chose for my card project, but use what you have in your own stash of course:
- A card base 30cm x 10.5cm, folded in half
- Some black or dark coloured cardstock
- Chalk Pastels plus some chalk applicators like these Soft Pastels
- White Craft ink
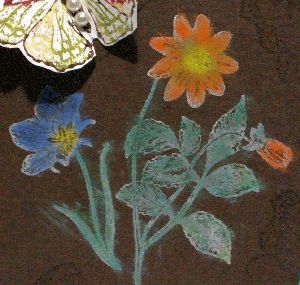
- Stamps of choice (I used the both retired Stampin' Up! sets Flutterby and also the flowers from Blessed Mother). You could choose any butterfly and flower combination that you like from your own collection of stamps.
- Embellishments. I used pearl ones for the butterfly.
Here's what to do:
First, ink up your stamps with the white Craft ink and stamp them onto
the dark cardstock. This creates a light background for your chalks to
'pop' off the page.This ink stays wet longer than pigment inks do, so be careful not to smudge it while you are working on other aspects of the card.
Before the ink dries, use the chalk applicators to colour the images the way you want them. Apply the lighter colours first. For example, I added the yellow flower centres first then used longer strokes to sweep the darker colour of the petals and stems in toward their centres.
Use the chalk eraser that comes in the kit of Pastels or an art gum eraser (available at Spotlight and Office Works in Australia) to remove any
chalk that winds up outside the image you are colouring, but I find
being too perfect isn't necessary as some smudging adds to the charm.
This is a personal choice for you to make, of course. Be as perfect or as smudgy as you would like!
Add more colour till you are happy with the result.
Allow the ink to dry naturally or help it along with a heat tool after it has been coloured to your satisfaction.Be careful not to heat part of the image too long or the ink could bubble a little. Move the heat tool around so heat gets distributed evenly.
Now use your image to finish your Black Magic card. I used a punch to scallop the edges of mine then I mounted it on some Azure Afternoon cardstock that I added ribbon and a cardstock strip to.

Another more DEFINED way to create the Blackboard Effect:
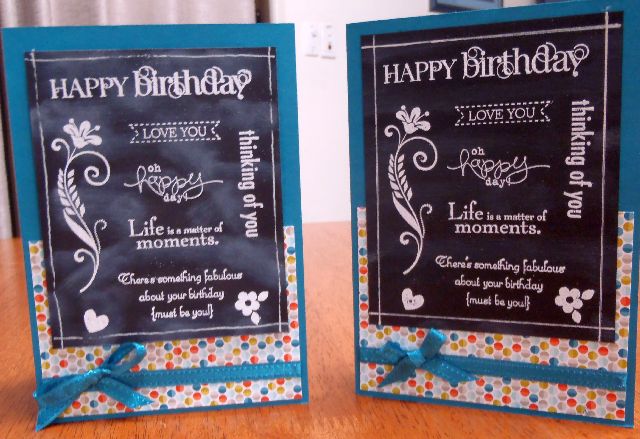
You can use heat embossing with white embossing powder and Basic Black cardstock to create a less smudged blackboard effect.
That's what I did when I made up kits for one of my card classes.
You choose the stamped words you want for your card and heat emboss them onto your Basic Black cardstock piece in white embossing powder.
To make it look like an old time black board, the card on the right has not been smudged, but the card on the left has had the Embossing Buddy dragged over it once the words and images were heat embossed to make it look like a smudged, used black board. The Embossing Buddy has white powder in it that stays behind and is most noticeable on black cardstock:

The degree of smudging you use all depends on the effect you want to create for your own project.
I drew around my black cardstock with a white Sigmo gel pen (available at Spotlight and Office Works in Australia). Then I chose some Designer Series Paper and made it the size of the lower part of my Azure Afternoon card front minus a little border. I added some stitched ribbon to the bottom and tied it in a little bow. Then I adhered the DSP to the card front.
The blackboard pieces were popped up with Stampin' Dimensionals and added to the card front.
I could have added a Rhinestone to the little flower in the lower right hand corner to help it pop a little more, or made a row of three under the main image and above the ribbon bow or opposite it, now that I think of it.
Isn't it great that we have so many choices when it comes to being creative?
Now I hope you will go forth and create a blackboard card of your own!
If you enjoyed this project, you might also like one of the following ideas:


New! Comments
Have your say about what you just read! Leave me a comment in the box below.