- Home
- Papercraft Adhesives
- Christmas-Banner
Christmas-Banner
Written and Created by PaperCraftCentral Susan
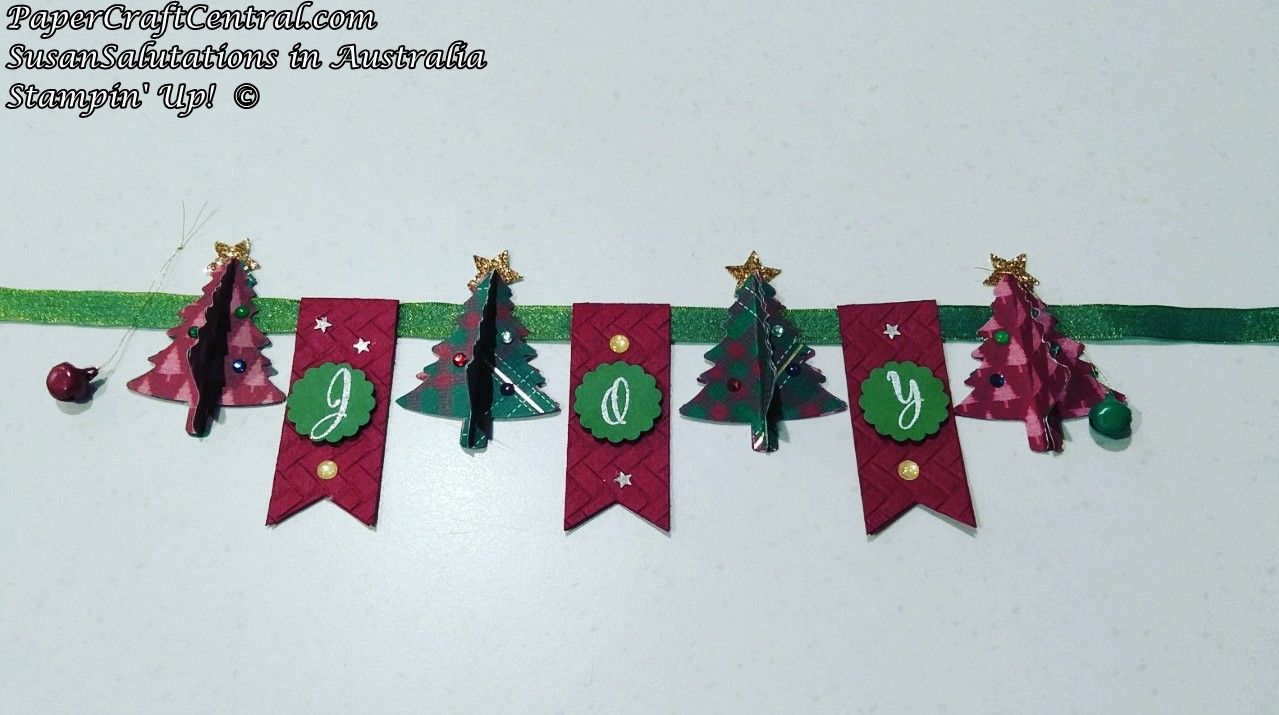
Make a Christmas-Banner using your stamps and punches this year!

Sometimes you just need a little decoration to fill in a space in your Christmas decor. I like to make little banners for our caravan each year. It creates delight for the grandchildren to see our new decorations when we visit.
This banner is not a big one, but of course you can add more elements and letters to spell out whatever you want your message to be. Make your banner as long as you like!
There are many other shapes that will also work well on a banner. You could use Christmas bauble shapes, stars, angels, whatever says Christmas to you.
Your message could be very personalised, spelling out your family name or a special message or just a single word like Christmas. Just place decorative elements between the words if you use more than one word.
Dangles fromt he banner could be things like threaded buttons, beads or even tinsel.
Above all, have fun personalising your own banner for your Christmas celebrations.
How to Make This Christmas-Banner:
First, gather your supplies.
You will need:
· 60cm of ribbon, two 6” pieces of gold twine
·
A
6” x 6” piece of designer series paper (I used Perfectly Plaid here)
·
Three
6” x 1” pieces of coloured cardstock (I used Cherry Cobbler)
·
Contrasting piece of cardstock measuring 1” x 4” (I used
some Garden Green)
· Make a Difference stamp set
. Bone Folder
· 7/8” scallop punch, small star punch, Banner triple punch and Pine Tree punch
· Versamark ink, Shimmer White embossing powder
·
Embossing
folder & Big Shot
·
Small
piece of glimmer paper (I used gold)
· Two Jingle Bells
·
Bling (I used a variety of faceted gems and resin stickers, and some tiny non-Stampin' Up! silver stars I had from another year)
· Tombow multi glue, double sided Tear ‘n Tape, Stampin’ Dimensionals
How to Make It:

Here are the steps for making the banner. If you need clarification about anything, let me know in the comments at the bottom of the page.
INSTRUCTIONS:
· Cut 12 pine trees from the dsp with the punch, score 8 of them from top to bottom and fold in half. Adhere in pairs, set aside
· Stamp the letters “Joy” on the contrasting cardstock in Versamark, emboss with Shimmer White, punch letters out with scallop punch
·
Score
the 6” x 1” pieces in half, cut tails with banner punch, run through embossing
folder in the Big Shot
· Lay out the ribbon, start in the middle and lay out your trees and banners where you want them. Adhere the double pine trees to the single pine tree over and under the ribbon, using Tear ‘n Tape. Add the banners over the ribbon and adhere with Tear ‘n Tape
· Add the letters to the banners with Dimensionals
·
Thread
the bells with gold twine, tie off, then loop over the ribbon at each end of the banner
· Embellish with bling and stars
Now if you make a Christmas-Banner, I would love to see it!
Do You Have A 3-d PaperCraft Project To Share?
Do you make 3-d PaperCraft items? I'd love to see your work. Please do share below.
Go back to the 3-d papercraft ideas page to find more Christmas projects and ideas. I also recommend the Paper Stars page if you want to make your own bauble-type decorations.


New! Comments
Have your say about what you just read! Leave me a comment in the box below.