- Home
- Papercraft Adhesives
- Congratulations Greeting Cards
Congratulations Greeting Cards
Written and Created by PaperCraftCentral Susan
Congratulations greeting cards are always welcome on those special occasions.
"Send someone a note that reads "Congratulations." Regardless of who he is, he'll think he's done something the past week to deserve it".
~Anonymous

Congratulations greeting cards are handy to keep on hand for those special occasions that crop up without warning (or happily, as expected) when someone achieves a goal, is given recognition or just when you want to boost someone's confidence a little. Receiving acknowledgment via a handmade greeting card can really make someone's day. And I am all for making people feel warm and appreciated!
How to Make a Congratulations Greeting Card
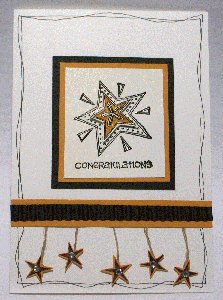
I try to keep one or two cards on hand so I can be prepared in case I need them in a hurry. I made this card for the Brisbane Papercraft Expo display and later added it to my stash. Events where you want to give someone kudos can be planned, but they can also arrive in life unexpectedly, so it is best to be prepared I think. Also I find that if I have such a card in my stash, I am more likely to think about how and when to use it, so it doesn't stay there long.
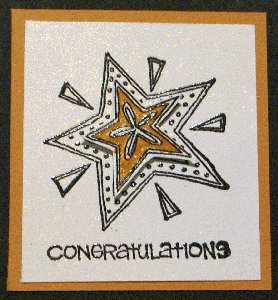
I made it by first choosing a stamp from the (now retired) Fun and Fast Notes set by Stampin' Up! I thought the star image suited my purposes perfectly and realised the middle could be cut out and popped up to add dimension.
TIP: Choose a stamp set that appeals to you and has an image that can become a special feature on your card.
I stamped and heat embossed two images on Whisper White cardstock (including the sentiment which handily came with the stamp) that I spritzed with Shimmer Paint that I had in a spritzer bottle mixed with some rubbing alcohol, with black embossing powder. Then I used a More Mustard (retired) Stampin' Write marker to colour in the star on one image and cut it out with some scissors. I placed the cutout over the other image with a Stampin' Dimensional.
TIP: Use colours you like to accent your own card.

Then I mounted the popped up image on More Mustard and Basic Black cardstock layers and placed it on a white card base. I doodled around the edges with a black journaling pen. See the double lines? I drew a straight-ish one first then looped the second one in and out over the first one.
Then I cut out some stamped stars and dangled them from some Linen Thread from the strip of More Mustard and Black cardstock. I adhered it to the card too.
I thought adding a few rhinestones to the little stars would set the card off. And I think they did.
May I encourage you to make some congratulations greeting cards to keep in your stash, too?
You might also like to make a small gift to go with your card. If so, try these ideas:
- Chocolate Sliders
- Explosion Box album (fill it with pictures of the congratulatory event)
- Footlocker Box to hold a hand made greeting
Return from Congratulations Greeting Cards to Special Occasions | Return to PaperCraftCentral Home Page


New! Comments
Have your say about what you just read! Leave me a comment in the box below.