google.com, pub-5059501654592326, DIRECT, f08c47fec0942fa0 google.com, pub-5059501654592326, DIRECT, f08c47fec0942fa0

Explosion Box Album

Written and Created by PaperCraftCentral Susan

"I always wondered how to make an Explosion Box Album.
Now I know! Thanks!"
~A PaperCraftCentral Reader


An Explosion Box Album is a lovely 3-d papercraft gift. It is also a way for you to display some special photos in an unusual form.

This type of handmade container can be  one with a surprise. On the outside, it looks like an ordinary box, but once you lift the lid it reveals multiple layers that can each be decorated the way you want them, with plenty of room left for a surprise gift to be hidden inside.
Explosion Box Album Tutorial

Explosion Box Gift Ideas

Once you know how, these little projects can be made up quite quickly. You can add more layers to the box, but the basic pattern I am going to use here has just three layers.

There are four small double-sided pages for photos on each layer and a fifth one in the center of the last layer in your album. So for a three layer box you will need approximately 24 photos or journaling spots.

You can also add photos to the inside and outside of the lid, or even to the bottom of the box! So you could have 27 photos if you wished.

There's a completely decorated project with photos in it at the bottom of the page. Scroll down to see!


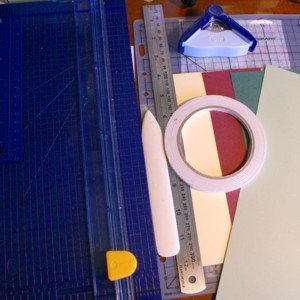
To Make a 4" (10cm) square Explosion Box album, here's what you will need:


  • Four pieces of A4 cardstock either in the same colour or in coordinating colours if you like
  • A paper trimmer
  • A bone folder
  • A ruler
  • A pencil
  • Strong adhesive such as double sided tape
  • A corner rounder punch
  • Embellishments of your choice. Eg: ribbon, cord, string, stickers, designer series paper, paper or silk flowers (you can hand make them to suit your project), brads, etc
  • Your photos or sentiments/journaling treatments


Explosion Box tutorial

Here's What To Do to Make the Base:


  • Decide which colour cardstock you want for the outside layer (Layer 1) and make a square out of it that measures 21 cm x 21 cm (8 1/4" x 8 1/4")

  • Decide what colour you would like the next layer (Layer 2) to be and make a square out of that .5cm smaller than Layer 1 (20.5 cm x 20.5 cm or 8 1/8" x 8 1/8")

  • Decide what colour you want the next layer to be (Layer 3) and cut a square .5cm smaller than Layer 2 (20 cm x 20 cm or 7 7/8" x 7 7/8")

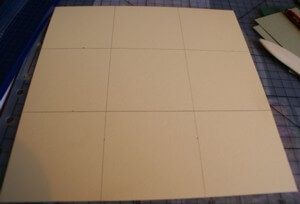
  • Now use your ruler and pencil or scoring tool to divide, mark and score each Layer into 3 equal columns: Score Layer 1 at 14cm (5 1/2") and 7cm (2 3/4") Score Layer 2 at 136 mm (5 11/16") and 68 mm (2 11/16") Score Layer 3 at 134 mm (5 1/4") and 66mm (2 9/16")

  • Turn each Layer 90 degrees and divide them into 3 equal columns using the same measurements as before

  • You should now have a grid pattern like the one below on each Layer:


  • Explosion Box template

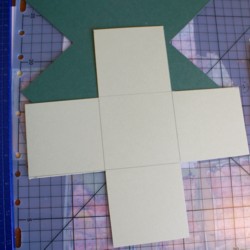
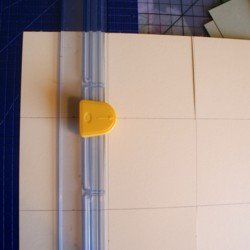
    Now cut the corner blocks out of each Layer like this:


    Explosion box tutorial
    explosion box album tutorial


  • Save the cut away pieces. You can use them to mat your photos or otherwise embellish the exploding box and everything will coordinate

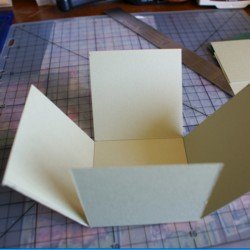
  • Next, score and then fold in the flaps for each Layer, creasing them well with your bone folder

  • Explosion Box tutorial


  • You should now have three Layers for the base, with Layer 1 forming the outside of the Explosion Box album, Layer 2 on top of that and Layer 3 placed in last.

  • You can now decorate the Layers as you wish before glueing them (or double-sided taping them - make sure your adhesion here is strong) all together in the centre. It is easier and more accurate to decorate the layers while they are still flat and unattached

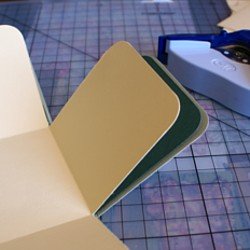
  • Rounding the corners of the flaps seemed to add a lot to my project but you may choose not to round your corners

  • Explosion Box tutorial

    By the Way - Have You Subscribed to Paper Twists Yet?


    If you like this 3-d paper craft project, subscribe to get free issues of Paper Twists, my occasional newsletter. (I try to aim to publish monthly but life gets in the way of papercrafting somtimes. Lol!)

    You will be among the first to know when a new 3-d project gets published at PaperCraftCentral.com and you'll enjoy some other benefits too.

    You'll get news about things like this:

    • Papercraft hints and tips
    • New ideas in the papercraft world
    • Reviews of new products and tools. What works….and what doesn’t
    • How to save money on paper crafting supplies

    Subscribe today! It's free!


    Testimonial

    Here Are the Next Steps for Completing Your 3-d Box:
  • I usually save my centre panel on Layer 3 for a special sentiment or message, but you can decide if this suits your purpose. A special photo surrounded by sentiments (on the flaps) might be just the thing, for example, or maybe you would like to just use photos. I have seen these with pop up or 3d papercraft objects in the middle, such as a three tiered birthday cake or wedding cake!

  • Here's What To Do to Make the Explosion Box Album Lid:

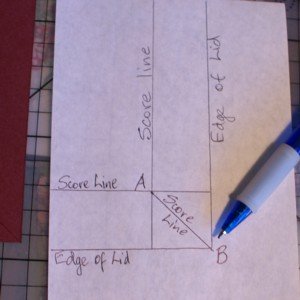
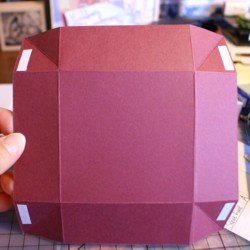
  • Take the fourth colour of cardstock to make the lid. Cut a square 14 cm x 14 cm(5 1/2" x 5 !/2"), or about .25cm (1/4") larger than the middle square of Layer 1
  • Score a line 30 mm or 1 3/16" from each edge

  • Flip the lid over. Now using the bone folder, score a line in each corner from where the lines intersect to the point of the corner, like this:

  • Explosion Box tutorial

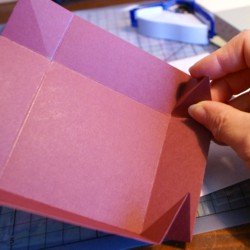
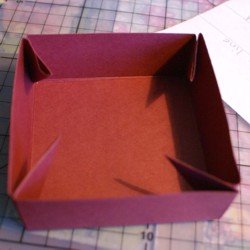
    Flip the lid back over again. Pinch each of the corners in like this and crease well with the bone folder:

    explosion box tutorial

    The lid is almost done! Adhere the corners to the inside of the box so you have a nice smooth surface inside the lid
    Explosion Box tutorial
    Explosion box tutorial

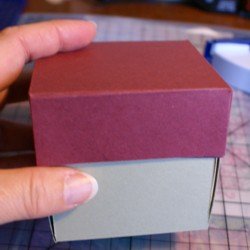
    Your lid will now hold all your Explosion Box album flaps in place. Embellish the lid and you're done.

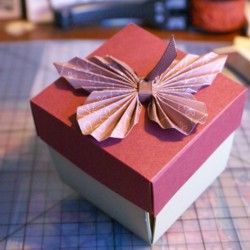
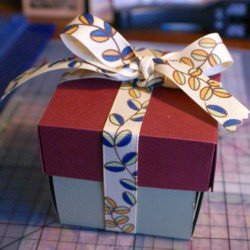
    I tied mine with a pretty ribbon but you can also use a paper butterfly or paper flowers or anything else you would like to use to decorate the top

    explosion box tutorial

    Inside the Explosion Box:

  • Decorate some of the inside flaps of your Explosion Box album with stamped images

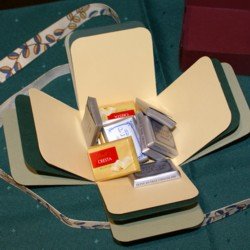
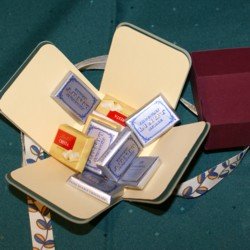
  • Place a gift inside the Explosion Box album, such as a small piece of jewellery or chocolates (yum! I used Lindt squares here. My favourite!) or pack wrapped lollies/candies inside and make Explosion Boxes as party favours

  • If you love chocolate as much as I do, pretty paper packaging with chocolates inside are a match made this side of heaven.

  • You may find some ideas at The Original Lolly Store in Melbourne, Australia, or you may need to search locally for a wrapped candy store nearer to you. (Note: I am not affiliated with the Original Lolly Store)

  • Explosion Box tutorial


  • Place a real flower or a small book or tickets to a special event in the centre of your Explosion Box

  • Add more layers and shape them like flower petals and use a pretty centre to give someone a beautiful handmade treat

  • Cut a fancy border for the box lid

  • Enclose a hand stamped candle inside

  • Make a 3d item such as another box, a layered cake, a paper ball, a handmade flower or origami animal inside. Imagine seeing a pretty butterfly with its wings loose or folded when you open the gift!

  • Enclose your chocolates in a pretty gauzy bag with a ribbon

  • Create a scene inside your box. I have seen theatre scenes, baby rooms, sports being played and so on.

  • Explosion Box tutorial

    Do You Have A 3-d PaperCraft Project To Share?

    Do you make 3-d PaperCraft items? I'd love to see your work. Please do share below.

    [ ? ]

    Upload A Picture [ ? ]


    Click here to upload more images (optional)

    Author Information (optional)

    To receive credit as the author, enter your information below.

    (first or full name)

    (e.g., City, State, Country)

    Submit Your Contribution

    •  submission guidelines.


    (You can preview and edit on the next page)

    What Other Visitors Have Said

    Click below to see contributions from other visitors to this page...

    Help me find a pencil holder 
    Excuse me but I have been looking for how to make a paper pencil holder and I saw a picture of it on Youtube and the name of your website under it so I …

    Click here to write your own.


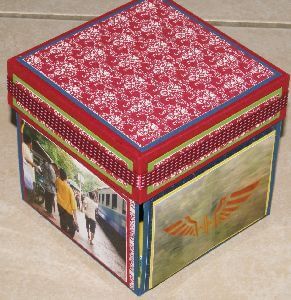
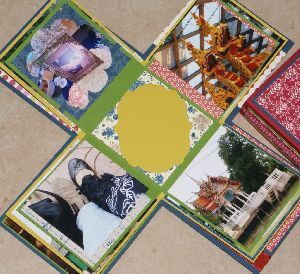
    Here's one of my completed projects with photographs and embellishments added. Hubby and I went to Thailand one year for a little holiday so this album now reminds us of some of the things we saw there.

    I put some Thai coins in the centre of this explosion box album and my grandchildren always ask to look at them when they come to visit us.
    Explosion Box tutorial
    Explosion Box tutorial

    Other Ideas you might like to try:


    PaperCraftCentral Home | Handmade Paper Wallet | Paper Wreathes


    Last edited by PaperCraftCentral Susan on 5th November 2023

    New! Comments

    Have your say about what you just read! Leave me a comment in the box below.

    Share this page: What's this?

    Enjoy this page? Please pay it forward. Here's how ...

    Would you prefer to share this page with others by linking to it? Click on the HTML link code below. Copy and paste it, adding a note of your own, into your blog, a Web page, forums, a blog comment, your Facebook account, or anywhere that someone would find this page valuable.

    var l = window.location.href, d = document; document.write('<form action="#"><div style="text-align:center"><textarea cols="50" rows="2" onclick="this.select();"><a href="'+l+'">'+d.title+'</a></textarea></div></form>');