- Home
- Papercraft Adhesives
- Card Challenge for You
Fourth Challenge of 2010 - Make A Paper Punch Bear!
Written and Created by PaperCraftCentral Susan
For the fourth challenge of 2010, I invite you to play with your papercraft punches or dies to make a papercraft teddy bear in your own style. Full challenge instructions are below.
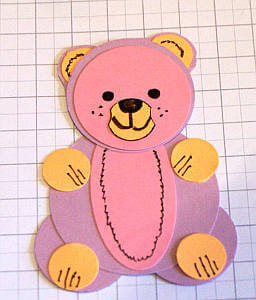
I made the pink, mauve and yellow bear below to be a baby card embellishment for a little girl. Do you like how it turned out? I was happy with my she-bear once I saw her all finished on my craft desk.
You don't have to make your teddies all pink and girly though. Scroll down for a more masculine bear example. This bear could be anything to anyone! You can even change his/her expression if you so desire. You are in control of how your bear turns out.
Are you ready to hear about the inspiration instructions?

Fourth Challenge of 2010 - Instructions
FOr the fourth challenge of 2010, we made paper punch teddy bears. But teddy bears are timeless. You can use these instructions any time to create your own version of punch art.
Make a paper punched bear with the following suggested items in mind:
- Choose the colours of your choice, and
- Choose the sentiment you want it to say, and
- Make it so that you can use your finished teddy bear on a card, handmade box or in a scrapbook layout, and
- Make it so that you can post it up to PaperCraftCentral using the form below
And another thing: you should also have fun while you complete this challenge and go ahead and be as creative as you can b.
That's all!
Oh yes. You can find the punch art teddy bear instructions here too.
More suggestions:
Use other mediums if you like (e.g.: paint, ink, glitter glue), choose your own embellishments, change the size of the bear, anything goes, as long as I can see that you used my basic pattern for your bear once it is finished.
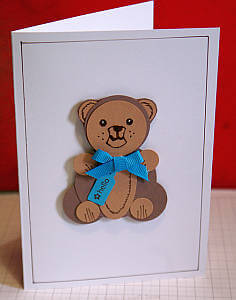
Here's that other example of a bear made using different colours and sentiments. I think it looks totally different to the pink girly bear I first showed you:

Don't you think this little guy could be used on a boy's page in a scrapbook, or to say hi to a friend, or to send a warm hug to just about anyone?
You could even change the decorative bit. Imagine him holding a sign that says 'gone fishing' or 'A gift for you' or 'Get well'.
This teddy can say anything!
Or how about putting him inside an explosion box card or album? What a nice surprise it would be to find a pop up teddy bear inside!
Are you inspired yet? I hope so! I would dearly love to see how your papercraft bear turns out.
Papercraft Teddy Bear Instructions
You will need the following supplies for your paper punch bear:
- Two colours of Cardstock - enough to cut out a large circle for the body (2"?), a medium circle (1.5"?) for the head, an oval (about 2" or maybe less) for the tummy, two circles (1"?) for the thighs, and 6-8 small circles for paws and ears (1/2"?) Decide which colours each of these parts needs to be for your own embellishment.
- Some adhesive such as Tombow Liquid Multi and if you want to pop up different parts of the bear, you will need some foam adhesive such as Stampin' Dimensionals.
- A fine marking pen such as the Stampin' Up! black marking pen
- Embellishments like fine ribbon, a little tag punch or die, bling
Here's what to do:
- Cut out all the pieces.
- Before you adhere any parts together, think about which parts need to go behind others and which should be at the front. Use the pictures as a guide for placing your bear parts. This will help you know where to place your glue.
- Arrange your bear on your craft space and using the marking pen, add a few details that may be hard to add once the bear is glued together. I added the tummy and ear details before I glued them together, for example.
- Once you are happy with how your bear looks, carefully adhere the pieces together. Use Stampin' Dimensionals if you are popping up the paws or face. I always find my Take Your Pick tool helps with this sort of assembly job.
- FInish adding your marking pen details for the face and claws, and add in the little bow and tag if you are using it.
- Add bling buttons or eyes, if you like!
- Now you can add your teddy bear to your project.
Thanks for taking part in the fourth challenge of 2010! Let me know if you could follow the instructions alright, and what project you had in mind for your teddy bear's final spot. Here's the place for you to show me your own handmade papercraft teddy:
Submit Your Challenge Entry Here
Please do show me your entry for the Challenges, with a picture or two or three, and a few words about how you made your creations.
Have fun with the fourth challenge of 2010 to make a punch art bear and do share if you make a bear! (Hey, that rhymes!)
If you liked this project, you may also like trying out the following ideas:


New! Comments
Have your say about what you just read! Leave me a comment in the box below.