- Home
- Papercraft Adhesives
- Making Get Well Cards
Get Well Card
Written and Created by PaperCraftCentral Susan
Make a cheery Get Well Card to take with you to visit a hospital patient next time instead of or as well as bringing fresh flowers.Sometimes the hospitals won't allow fresh flowers in, but they have never yet refused to let patients have a get well card, right?
"Get well cards have become so humorous that if you don't get sick you're missing half the fun".
~Flip Wilson

How to Make a Flowerpot Get Well Card
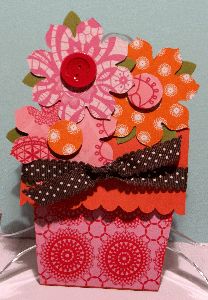
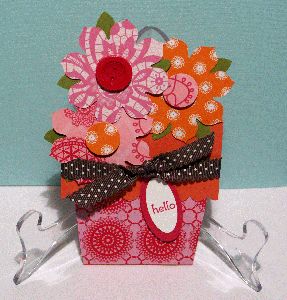
The flower pot card shown above is especially appropriate if your sick friend cannot have fresh flowers in their room. I know having a flower pot full of handmade paper flowers would be a great one for me when I have respiratory complaints. Much as I love fresh flowers, I cannot be near them when I am ill, and I know I am not alone with this problem.
I got my card idea from Splitcoaststampers and worked out the measurements and tools to use from my Stampin' Up! supplies.
This idea was also one I used at a class here at home. I think the attendees enjoyed making their cards and they wound up with some lovely Get Well Cards to take home :)
I just love an outcome like that.
Here's how to make your own flowerpot card:
Materials Needed:
- One 9” x 3 ½” piece of cardstock – flower pot (shown in Calypso Coral)
- One 2 ¼” x 4 ¼” piece of cardstock – pocket insert (shown in Basic White)
- One 2 ½” x 4 ½” piece of cardstock – pocket insert mat (shown in Calypso Coral)
- Three 3” x 3” pieces of designer series paper – flowers (shown in Flirtatious)
- Three 3” x 3” pieces of cardstock – flower backing (shown in Melon Mambo)
- One 3” x 3 ½” piece of designer series paper – flower pot front (shown in Flirtatious, now retired)
- Two 2 ½” x 2 ½” pieces of cardstock - leaves (shown in Old Olive)
- Three scrap pieces of designer series paper for flower centers (shown in Flirtatious and Melon Mambo)
- Stamp – inside verse (Stampin’ Up! Curvy Verses shown here, but use any Get Well Card sentiment you would like)
- Ink (shown in Melon Mambo)
- Die Cutting and Embossing Machine & Flower Die
- Paper Punches (5-Petal Flower Punch, Scallop Edge Punch, Oval punches, ½” & ¾” Circle Punches shown here, but they are retired)
- Melon Mambo Button - handmade or store bought
- 14” of Ribbon
- Basic White and Melon Mambo cardstock scraps for tag

Step-By-Step:
- Make hand made button first by punching 4 x ¾” circles, then 4 x ½” circles cut out again with ¾” circle punch to form a ring. Adhere all circles and rings together then affix rings to button base. Mark where you want the button holes then pierce with your Take Your Pick tool
- File edges of button when dry, then coat rim and button face in a thin layer of Fine Tipped Glue Pen glue. Set aside on waxed paper or your silicone craft sheet to dry. (I left mine for a couple of hours but overnight is best).
- Score 9” x 3 ½” piece of cardstock in landscape position at 2” and 5 ½”. Use the Simply Scored tool from Stampin' Up! to do your scoring.
- Fold the 2” score line in a mountain fold and the 5 ½” score line in a valley fold.
- Punch the edge of the 2” front flap with a Scallop Edge Punch or similar
- To create the flower pot shape, place the cardstock in your paper trimmer with the top 2” flap flipped up and the bottom flap folded behind. Line up the 2” score line with the cutting track and the 5 ½” fold line with the ½” mark on the trimmer. Place the cutting guide over the card and cut. Turn cardstock over and repeat.
- Adhere the 3” x 3 ½” piece of patterned paper to the bottom front of the flower pot. Flip the flower pot over and trim away the excess patterned paper from each side.
- Tie ribbon around the top part of the flower pot to hold the pot together, no adhesive is needed but I did put a small amount along each edge. Attach a tag to the ribbon if desired.
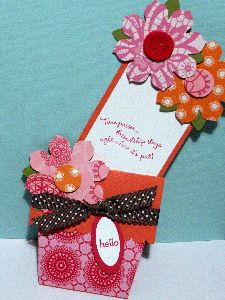
- Adhere the 2 ¼” x 4 ¼” piece of cardstock to the 2 ½” x 4 ½” piece of cardstock. This will be the insert piece with the flowers attached at the top. Stamp your sentiment on the lower portion.
- For each flower, use one piece of 3” x 3” patterned paper and one piece of 3” x 3” cardstock. Apply a small bit of adhesive between the squares before running them through the Die Cutting and Embossing machine to cut out your flowers.
- Run each 3” x 3” piece through the Die Cutting and Embossing machine to create the flowers. Punch ¾” circles out of scrap patterned paper for the flower centers and adhere one piece to the center of two of the flowers. For the third flower, adhere ¾” circle to a hand made button with a glue dot and then attach it to the center of the flower.
- Punch out each 2 ½” x 2 ½” piece of cardstock with the 5-Petal Flower Punch (retired) or similar and cut the petals apart to create leaves.
- Attach 2 flowers to the top of the insert piece with Stampin' Dimensionals. Attach the top flower to one of the other flowers. Tips: To help with alignment, place the insert piece inside of the flower pot before attaching the flowers to it. If you want your card to fit into an A5 sized envelope, line the envelope up underneath the card and use it as a guide while attaching the flowers to make sure they are not too tall or wide for the envelope.
- To attach the leaves, place adhesive on the end of each leaf shape and adhere your leaf in between the flower layers.
And there you have a lovely pot full of flowers as a get well card all ready to give a friend who is feeling poorly.
Of course, feel free to use this Get Well card idea for other occasions as well.
What about using it to welcome someone to a new home, or for a garden party, a special birthday, etc? Colour theme it to your occasion and watch people smile as they open their lovely handmade card :)


New! Comments
Have your say about what you just read! Leave me a comment in the box below.