- Home
- Papercraft Adhesives
- How to Make a Circle Journal
Nostalgic Circle Journal
Written and Created by PaperCraftCentral Susan
How do you create a nostalgic circle journal?
Ah, nostalgia! I took part in a craft challenge about this once. Let me tell you about it.
"People seem to get nostalgic about a lot of things
they weren't so crazy about the first time around."
~Author Unknown

What is a Nostalgic Circle Journal?
To find out what a nostalgic circle journal is, let's look at the meaning of nostalgia first. Wikipedia says:
"Nostalgia is a sentimentality for the past, typically for a period or place with happy personal associations."
So it is about a memory from your past that creates some sentimental feelings of happiness? Hopefully you have some of those. I know not everyone does, but most of us can pinpoint a time, a place, a person or a pet who made us feel happy.
I am a bit of an introvert so I could have picked a place like Montville in Queensland where I once went alone to spend a few hours sitting in the sun reading and drinking cups of tea at an outdoor cafe. Ahh, such peace.
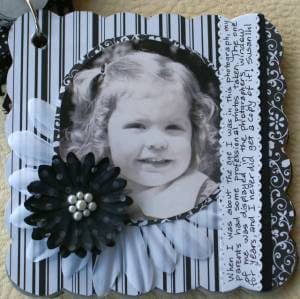
Instead I picked a picture of myself as a child, still enjoying a life of no responsibility and want, safe in the love of my parents.
So now we have the topic of your scrapbook page. The Circle Journal part is about involving other people in a swap! It's about creating a journal that you share with others.
In this case, I joined with a group of crafting friends. We each made the cover of our own journal and put in enough pages for each of us in the swap to create a page for each other.
We mailed our journals to each other and each person in the swap created their own page about a nostalgic memory. Everyone wound up with pages about what made their friends happy. It helped us get to know each other on a deeper level.
You can read more about what a circle journal is at Families.com if you like. There are many different ways to make them.
My Nostalgic Circle Journal Layout - Process
First, I found out about the fact that a Nostalgic Circle Journal swap was created as one of my friends invited me to join it. Once I joined my group of friends we decided to give ourselves a little time to create our page about a nostalgic memory, our album covers and add enough blank pages to include every swap member.
Then we decided how to swap our journals with each other. We made a list of the friends involved in the swap and we each mailed our journal to the person next on the list under our own name.
I decided to make mine a small journal. I chose a little scalloped chipboard album that measured about 4" x 4" (about 10cm x 10cm). The swap directions for this entry were to scrap a page about a childhood memory using only black and white supplies, and a photo was optional. As my particular childhood memory was tied up with a photo I decided to use a black and white photo.
I happened to have some lovely black and white paper that was striped on one side and flowered on the other. When I searched my stash I found some black and white flowers and some white pearls along with some black ribbon and some plain white cardstock. That was enough to spark a plan!
I made many more pages for this Circle Journal and it was the loveliest swap. I received some beautiful pages in return.
This is how I decorated my page:
I
detached a page from the album by opening the book binding ring, then
traced around the scallops onto my patterned paper. I cut this out so it
was a perfect fit using my craft knife and self-healing cutting mat.You can also use a paper file to soften down the edges and make them even more seamless with the chipboard.
Next I attached the striped paper to the page and cut out the hole for the book binding ring to go through.
After that I cut out my photo so it was a circle and matted it onto a circular piece of flowered paper and set it aside.
Next I found the biggest white flower and added it to the lower left hand corner of the page, making sure the petals didn't overhang the page. Then I adhered the photo to the white flower. This allowed me to add the polka dotted flowers to the photo where I wanted them to be, which was off-centre for the white flower. Some white pearls in the centre of the flower completed the look I was after.
The right hand border was completed by tracing the scallop pattern of the page onto a strip of flowered paper, cutting it out and adhering it. Next I added a piece of black ribbon, then I cut out a strip of white paper and scallop edged it with some little deckle edged scissors I had. This was also adhered to the edge. I added some black dots to each scallop with my journaling pen and completed my journaling, which was my story about the photo.
And I was done! I really liked the effect of the black and white supplies with the black and white photo.
Why not try this colour combination yourself and see how you like scrapping in black and white? You can always use paper punches to make your shapes and borders and your Die Cut and Embossing Machine dies the same way and also to make paper flowers instead of doing so much hand-cutting.
And if you do make a page or two for a nostalgic circle journal swap, don't forget to share your project with me!
Do You Have Scrapbook Page to Share?
Please do share your scrapbook layouts and projects below.

Return from Nostalgic Circle Journal to Scrapbooking | Return to Papercraft Central Home Page


New! Comments
Have your say about what you just read! Leave me a comment in the box below.