- Home
- Papercraft Adhesives
- Paper Chain Tree
Paper Chain Tree
Written and Created by PaperCraftCentral Susan
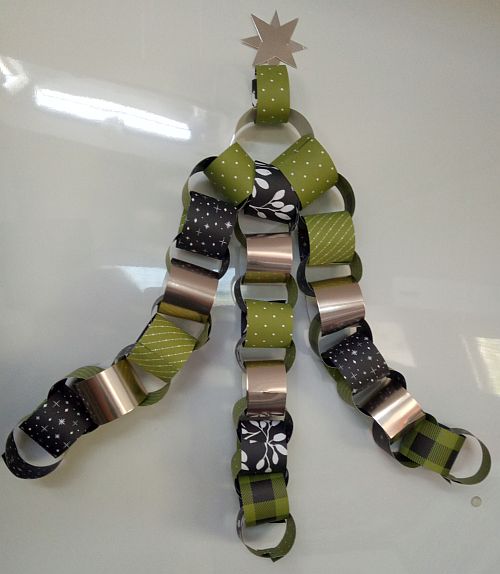
Did you know you can make a paper chain tree for your Christmas decor? It's a quick and simple project, and even the children can help.
I needed a decoration like this for our caravan as a conventional tree would have been too large. This one fits nicely on my wall.
You might like one for your entrance way, refrigerator, or somewhere else that just needs a touch of brightening up. In that case, you may want to add to your chains and make the tree even bigger.

How to Make a Paper Chain Tree
I once showed you how to make adhesive-free paper chains. Now I can show you a way to use them to make some Christmas decor by making this paper chain tree.
Supply list:
You will need:
- Thirty-seven strips of scrapbook paper 6" (15cm) long by 1 3/8" (3.5cm) wide. I used strips made with the Merry Little Christmas designer series paper pack from Stampin' Up!
- One strip of scrapbook paper 8" (20cm) long by 1 3/8" (3.5cm) wide
- Paper snips
- Extra foiled paper to make a star for the top of the tree
- Blu Tack or other removable adhesive for fixing your tree and star to the wall
I did use a few strips of Stampin' Up! champagne foil paper for some of my links.
NOTE: Feel free to use your own combination of papers and patterns, of course. It is best to try to use the same weight of paper for the entire project to keep it from putting too much strain on any one point, but mine even worked when I just used a few pieces of heavier card stock (the foiled paper).
Instructions:
- Make each of the strips into a paper chain link by cutting the opposite sides of each strip as shown on the paper chain page.
- Join one link together making sure the ends of each link are inside the circles. Add another link to the first before you join in, and so on.
- Make three paper chains, each twelve chains long.
- Link the three chains at the top with the largest length of cardstock. You need a little extra length there as the three strings are wider than a single string. This will form your tree.
- Add the final chain link to the top, to allow for a flat surface to take your adhesive.
- Make a star for the top of the tree.
- Now arrange the three legs of the tree and affix them to the wall with Blu Tack.
- Add the star to the top of your tree, affixing it to the wall.
You are done with the basic idea here, but there are a few other ideas I thought of:
- You could make a much bigger tree by making your lengths of loops longer, adding more 'branches', making the actual links bigger or smaller or even in graduating sizes (bigger at the bottom, smaller at the top, or haphazard).
- You could add more decorations in between the branches.
- Add presents to the bottom of the tree, either flat ones for the wall or real ones for the floor.
- Use more glitter and bling - sequins, beads, stars, rhinestones and pearls
- Make flat paper candles or baubles and adhere them to the wall along the arms of the paper chain tree.
However you make your decor, now stand back and admire your beautiful new decoration!
While you are at it, take a photo and show me your lovely project. I'd love to know if your children also helped.
Do You Have A 3-d PaperCraft Project To Share?
Do you make 3-d PaperCraft items? I'd love to see your work. Please do share below.
I hope you enjoyed this project.
You may also like the following:


New! Comments
Have your say about what you just read! Leave me a comment in the box below.