- Home
- Papercraft Adhesives
- Paper Rosebud Tutorial
Paper Roses
Written and Created by PaperCraftCentral Susan
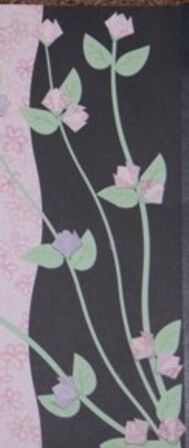
Little paper roses (or rosebuds) are easy to make once you know how. Keep reading to find out how to make yourself some today.
"The rose speaks of love silently, in a language known only to the heart."
~Anonymous

Do you like roses? Did you know you can use paper roses on your scrapbook layouts, on handmade greeting cards, and on off-the-page projects, or anywhere else you believe would be improved by adding a few pretty embellishments?
They would look nice on the lid of a handmade paper box too.
How to Make Paper Roses
This little video shows you how to make the rosebuds step by step. Scroll down for the written instructions and supply list that I put after the video:
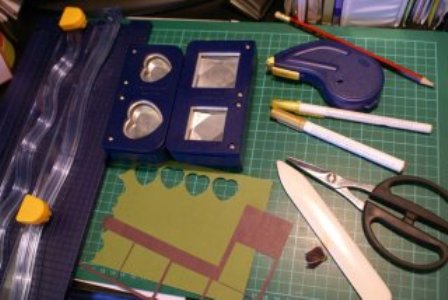
You will need:
- Thin designer series scrapbook paper (thick paper or cardstock is harder to fold but can be used if desired) for the buds and some plain cardstock for the stems and leaves
- A square punch or a ruler and pencil to measure out some squares of designer series paper, or use your paper trimmer
- A heart punch (or draw them freehand and cut them out with your paper snips)
- A wavy paper trimmer is helpful for making the stems but you can cut them free-hand instead
- A bone folder
- Adhesive of choice
- Scissors
- Decorative pens such as Stampin' Write Markers to add some details

Here's what to do to make your paper roses:
NOTE: Visual step-by--step folding instructions are located below these instructions.
- Start with the thin designer series paper that you have cut or punched into squares. The size of your squares will determine the size of the finished rosebuds.The bigger the square, the bigger the rosebud, and vice versa, so experiment and find the perfect size for your project. While learning how to make the buds, start with a bigger paper for easier folding. Then move on to smaller squares.
- Fold your square point to point, then unfold the paper and fold the other points and open it out, so you wind up with a square that has a 'cross' in it. Make your folds really crisp and as accurate as possible. Use a bone folder to crease the folds.
- Unfold your square and fold the points all in to the centre (did you notice? These first few steps are the same as when you made chatterboxes or as a kid!)
- Unfold your square. Pinch it together by pushing two opposite sides towards the centre to make the shape shown below, and crease the folds well with the bone folder.Turn the paper over so you have the fold side towards you.
- Fold two of the bottom points up towards the top points (don't fold them down, unless you want a more elongated shaped flower) to make the petals. Widen them out so you have a 'middle' to the flower with a centre point.TUrn the paper over.
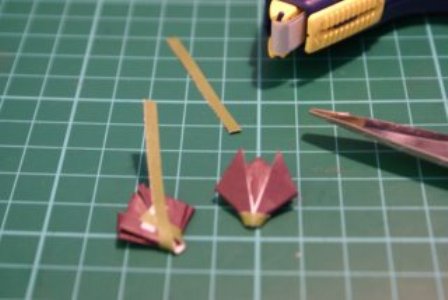
- Fold the other two points up to meet in the middle of the back of the flower. You don't want them to show so they should be as close together as possible. Place some adhesive on the back and stick the back folds to the flower to make it flatter.

Now let's make the flower base.

I then used the pointy end of my bone folder to press lines to form the veins of the leaves. Then I took a a gold metallic pen (you can find them at Officeworks or at newsagencies) to embellish the flowers and leaves.
How to make the rosebud leaves and stems:
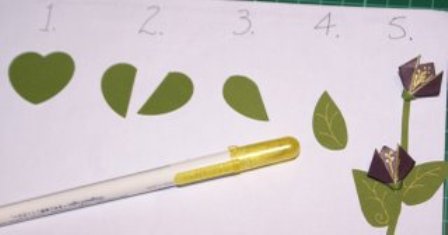
The photo above has numbered steps on it to show you how I made my leaves:
- Punch out some heart shapes from green cardstock. Each heart will make two leaves
- Cut the hearts in half vertically with your paper snips
- Trim the two halves of your hearts into leaf shapes, with the point of the heart being the tip of your leaf
- Decorate your leaves with the gold metallic pen, or choose another colour from your Marker collection to draw in leafy details
- Cut some thin wavy stems using the trimmer or you can cut them out freehand.
- Arrange your stems, flowers and leaves behind your paper rosebuds to suit your project, trimming down stems if they are too long
More ideas to try:
- Use plain white paper to make the rosebuds and colour them with your Markers
- Try different sized squares and hearts to make the elements (You will get different sized flowers and leaves this way)
- Arrange the buds into a bouquetinstead of a border
- Use several different coloured papers to make your buds
- Use glitter, gems or embossing powders to further enhance your buds and/or leaves
I hope you will enjoy making paper roses for your special projects. And remember you can also make 3-d flowers with your versatile heart punches too.
If you liked these ideas, you may want to try making other paper flowers:
And do share these instructions with a crafty friend who might like to know how to make some embellishments this way too.


New! Comments
Have your say about what you just read! Leave me a comment in the box below.