- Home
- Papercraft Adhesives
- Paper Twists Issue 2
Paper Twists Issue 2
Welcome to PaperCraftCentral's Paper Twists Issue 2!
Here's what you will find in this issue:
- A Welcome
- A Product Review
- Money Saving Tip
- A Special Blogger
- New project ideas at PaperCraftCentral.com
May I extend a special welcome to you if you are a new subscriber to Paper Twists!
Where does the time go? I am finding it hard to believe that a quarter of the year has passed by already. How are your papercraft projects coming along? Let's see - we've had Valentine's Day already, Easter is coming, and then next on the calendar in the Southern hemisphere is Mother's Day. There's always plenty to craft about!
Would you like some inspiration? Read on!
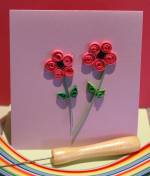
I went to a Papercraft Show in my town and were there some new ideas there. It was exciting to walk around watching the demonstrations, and there were options for attending paid workshops as well. One idea I saw demonstrated and want to do more with is paper twilling or paper quilling. What an economical and effective little embellishment you can make with tiny strips of paper.
Paper Twists Issue 2 Product Review - Quilling Tools
All you need are two simple tools. One looks like a large needle with a handle, and the other has a slightly larger bore and has a split shank and a handle. You can make very tiny little rounds with the needle tool and looser ones with the shank tool.
If you have a tool without a split or needle eye, it doesn't work too well but you can get the hang of it with practice.
Craft stores sell convenient packs of paper twilling strips and it looks like these will make many, many little spirals for you to use. I'll be posting an example of the tools and the technique to PaperCraftCentral.com soon.

Paper Twists Issue 2 Money Saving Tip
Make Your Own Custom Ink Pads
Did you know you can make your own ink pads with some baby wipes and a re-inker?
First find a flat plastic lid from an old yoghurt tub or similar. Take about three baby wipes (they don't have to be expensive ones - any of the cheaper varieties from a dollar store will work just fine as long as they are alcohol free) and fold them in half, then in half again. Use your re-inker to add ink to the 'pad' you created with the baby wipes and lay it on the lid for use. Use as you would a normal ink pad.
Once you have finished with it, slide the lid and baby wipe ink pad into a plastic bag (a zip lock one would work and have the advantage of being resealable) and seal it off from the air as well as you can.
Your homemade ink pad will keep for many a day and may even last months if the air does not dry it out.
If it does become a little dry, you could add some more ink, or just start all over again with some fresh, moist baby wipes.
Special Blogger
Aihara Ramintessah Sanchez, a wonderful crafter, did me the honour of asking me to be her Guest Artist for this week! Tessah seeks out a new person each week to showcase their paper crafts. Her blog is one I have put on my list to watch :)
Thank you for your support, Tessah, and I wish you every success with The Gallery!
And that's it for the Paper Twists Issue 2.
If you enjoyed it, please feel free to pass on a copy to your friends or to encourage them to subscribe. The more the merrier!
And I'd love to hear any feedback you have for me about what you would like to see in future issues. Do contact me.
Look forward to more specials and surprises in future issues of Paper Twists!
Happy Paper Crafting! Enjoy Paper Twists Issue 2!
NEW PAPER PROJECT IDEAS FROM PAPERCRAFTCENTRAL.COM
Lemon Meringue Pie Recipe Card
Special Postscript Just For You:
Do you enjoy paper crafting? Have you thought about starting your own website to showcase your work? Would you like to build a business online that enables you to work from home? See a review of SBI by following this link.
SBI made it possible for me to create PaperCraftCentral.com
PaperCraftCentral Susan


New! Comments
Have your say about what you just read! Leave me a comment in the box below.