- Home
- Papercraft Adhesives
- Penny Roller Card Instructions
Penny-Roller Cards
Written and Created by PaperCraftCentral Susan
A penny-roller card (also called a slider card) adds fun to your handmade greetings and can be adapted to many occasions. I chose a Christmas theme this time.
Find out how to make one right here on this page.
NOTE: You can also adapt this card to suit many other happy occasions. Scroll down to see instructions and suggestions for changes, but maybe go find two small coins first, such as two five cent pieces or two thin dimes. Very thin, light slugs could also work.
The coins or slugs will be essentials for your spinning mechanism.

How to Make a Penny-Roller Card
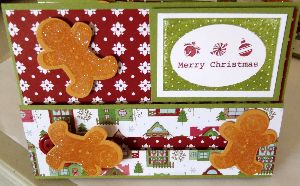
Aren't the gingerbread men cute? They were made with a matching stamp set and set of dies from Stampin' Up! (now sadly retired).You could choose another Christmas themed image to use instead though. There are usually some cute Christmas ideas made from die cuts or punched shapes in every Stampin' Up! catalogue.
I stamped three Gingerbread Men in Versamark on More Mustard cardstock (also retired) then embossed them with Iridescent Ice embossing powder (again, retired!. You could use any colour of cardstock that looks like gingerbread to you and you can choose to just make your cookies shiny by clear embossing them or painting them with Wink of Stella. Be sure to add details first with a marker or a stamp and then emboss them so the details won't run.
Embossing my Gingerbread Men made them look like iced sugared cookies to me.
Then I set these elements (the gingerbread men) aside to make the rest of the card.
Here's how I made my penny-roller card:
Step-by-step, this is how my card came together:
- Make a card base from half a piece of A4 cardstock. I chose Lucky
Limeade (retired) for mine. Work with it in landscape orientation. If you need measurements, I cut an A4 sheet of cardstock at 15cm, then scored it at 10.5cm.
- Cover the front of your card with a piece of designer series paper of choice, measuring 10cm x 14.5cm.
- Cut
a piece of cardstock at 5cm x 15cm and cover it in designer series
paper (dsp). Use a liquid glue like Tombow Multi or the FIne Tipped Glue Pen to make sure the dsp is adhered
well to the cardstock.
- Turn the 5cm x 15cm piece over and draw a pencil line down the centre, lengthwise.
- Cut a slot as wide as a Stampin' Dimensional along your piece, but leave the ends uncut.
- Adhere two coins together with a double stack of round dimensional foam (I used Stampin' Dimensionals with the hexagonal corners nipped off). Try to make your foam as round as possible. I believe you can also buy round shaped foam dots form craft stores.
- Slide
the double stacked coins into the slot and check to see that they roll
freely up and down it when the piece is tilted from side to side. You can powder the sticky edges with your Embossing Buddy (from the Embossing Additions Tool Kit - the little soft powdery pillow in the kit) to take away some tackiness if needed.
- Adhere the slotted piece to the front of your card with double-stacked Dimensionals, avoiding the slot.
- Adhere your best gingerbread man to the coins and tilt your card to see if he spins across it. If he doesn't, check for any obstacles or stickiness along the slot.
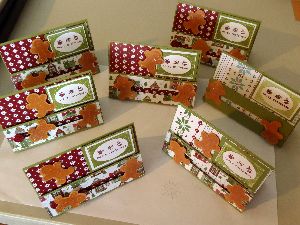
- Finish your card with more gingerbread men, a button and a sentiment.

Adapting for Other Occasions
Now you know how to make a penny-roller mechanism, you can make one with stars for a birthday, flowers for a congratulations day, a mortar board hat for graduation day, or make more Christmas cards with little spinning snowmen, trees or mugs of hot chocolate images.....
You may also like to make another form of spinning element card, a Suspension Spinner Card.
You can also purchase Die Cut and Embossing Machine dies from Stampin' Up! that will allow you to cut out slider card elements with ease. See what is available in the SusanSalutations online store.
While there you might like to check out current punches as well in case they have the shape you are after. I think it would be cute to use a Builder Punch to make a detailed figure for your spinning element.
NOw I am thinking of a flower shape that has a lot of sparkly bling on it. Oooh, yes! That would make a flashy spinner element. You could use ballooons, animal shapes, or anything that takes your fancy really.
I just love elements that move on a card. They add a lot of fun for the receiver, don't you think?
The possibilities are endless! Have fun!
If you liked this card, you may also like to try some other types of cards with an element of fun:


New! Comments
Have your say about what you just read! Leave me a comment in the box below.