- Home
- Papercraft Adhesives
- How to Use Rub Ons
Rubons
Written and Created by PaperCraftCentral Susan
Rubons are images that have a sticky backing and often resemble vinyl, though not always.
You can put them on many surfaces such as on cardstock, wood, metal, brads, glass and so on.
As long as the surface you are transferring to is smooth and clean with no wax or oil on it, you can usually be quite successful in using these transferable images on a surprising number of different surfaces.
"Life is just a scrapbook
waiting for us to put it on acid free paper."
~Author Unknown

These papercraft embellishments are different from stickers as they
do not have the clear outline around them that stickers have and they
are more finely detailed in many cases. Also, they are not raised.
They can be applied to almost any flattish surface, so really they can be used in cardmaking or off-the-page projects as well. They can be applied to curved surfaces too, with care (such as a plastic mug or cup, but be aware they are not dishwasher safe!)
Small Warning! Once they are stuck down, they are almost impossible to remove without scratching hard, so do be sure you have found the right place for them before applying them or your project surface, especially a cardstock one, may be marred.
How to Apply Rubons
Rubons are applied using a flat stick like a paddle-pop or ice cream stick. There is usually a wooden ice cream stick included in the packet just for this purpose.
The secret is to keep the image attached to its clear plastic backing until you actually rub it onto your project. Otherwise the image can become twisted or marred.
Here's how to apply your rub-ons:
- First, decide which image you want to use and where. Then, carefully cut around this image, keeping the clear plastic sheet AND the backing sheet with it to protect the delicate image from rubbing off or distorting before it reaches its destination. Cover and replace the other images back into their packet for future use so they won't get accidentally damaged
- Remove the clear plastic sheet (the loose one). It should still be attached to the backing sheet. Carefully turn your image over and place the sticky side onto your project, without sliding it if possible as this may dislodge your image from the backing sheet too soon
- Now use the angled end of the wooden paddle pop or ice cream stick (depends which country you are from what you call it!) to rub horizontally over the image through the backing sheet, pressing it onto your project so the sticky parts adhere. Use a firm and even pressure. You will notice the appearance of the image grows whiter/paler as it transfers off the plastic to your project
- Slowly lift a corner of the plastic backing to check and see if all of your image has been adhered. You will still be able to replace the plastic in the exact same spot for further rubbing if you do not lift off the whole thing right now
- If you are sure you have the image adhered well, slowly lift off the backing sheet, checking to be sure all of the image is stuck down. If there is a part of the image still on the backing sheet, just lay it back down and rub the image a bit more, making sure you pt it back in exactly the right spot
And there you have it! Your rub on should now be safely in place and looking good!
How can you use them?
- I love the scrolly ones and use them to embellish around photos, the corners of pages, or around a heading or other text
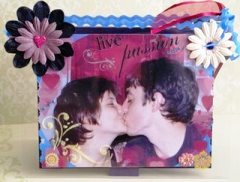
- Decorate a picture frame
- Decorate a tag you plan to use in your layout
- Place them on the covers of your albums
- Make a special keepsake using Foil, Glitter and Flock images you can get them from a craft store as I have done on Window Sheet for this special engagement card
- Decorate a hand made box or other 3d item with them
- you can apply them to many surfaces, including wood, leather, metal and acrylic, such as I did on the card shown below

Now for a challenge:
If you would like to go a step beyond and make your own customised transfers, you might be surprised at how simple this can be to do. I show you how I made my own transferrable image to make a book mark when you open the link.
Making your own transfers means you can customise them to say anything you want them to, and with a graphics program on your computer you can even customise the images you make. For small projects and one off items, making your own could well be the solution.
More Techniques to Try
If you enjoyed this technique, you may like to try some of the following tutorials:
Have fun!
Return from Rubons to Scrapbooking Tips | Return to PaperCraftCentral Home Page


New! Comments
Have your say about what you just read! Leave me a comment in the box below.