- Home
- Papercraft Adhesives
- Wedding Card Ideas
Wedding Greeting Cards
Written and Created by PaperCraftCentral Susan
Make your own wedding greeting cards, especially when you want to send one from a group of people, and completely customise them to suit the occasion.
"There are three things that last: faith, hope and love, and the greatest of these is love."
~I Corinthians 13:13
Handmade wedding greeting cards can be such fun to make because you can customise them to suit any occasion.
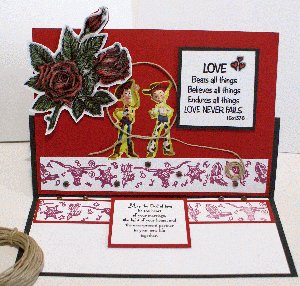
How I Made my Wedding Greeting Cards
When two young people from our church announced their wedding plans, I wanted to make something special that the whole congregation could sign for them.
I asked the groom's mother to tell me what the wedding theme would be. You know what I meant, right? I wanted their special day's colours, the symbols they were going to use, how formal the wedding would be etc.
When the mother said the couple liked cowboys, cowgirls, roses, ropes, the colours red, black and white, AND they had a sense of humour, it took me a little thinking time to come up with an idea. I was very glad I had a bit of time to do it.
I still had very few ideas about how I could make my card till I went browsing at the local shops. I tried the toy section of the shop and suddenly remembered about Woody and Jess from the Toy Story films. Were there any stickers available, I wondered?
It took some hunting at a couple of stores but I did find a children's sticker book with the figures of the characters I wanted. The figures needed to fit on the front of my card and I thought the ones I found might be just the right size. Now I had a basis for my idea.
At home of course I looked through my Stampin' Up! cardstock to select the Cherry Cobbler colour that went so well with the stickers. Basic White and Basic Black cardstock fitted the theme too so I selected them. That's when I decided to make an easel card as well.
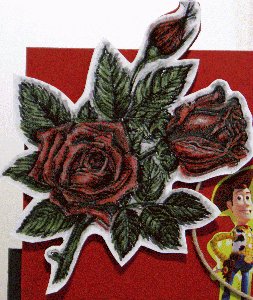
I wanted to make a cute story for the front of the card so I selected some Stampin' Up! linen twine for the 'rope' and then dug out my old Stipple Rose stamp set (retired from Stampin' Up! years ago but I love it so I am keeping it) and stamped it out in Versamark ink before heat embossing it in black.
I then used my Cherry Cobbler and Old Olive Stampin' Write markers to color the image and cut it out.
I also found a retired Western themed Stampin' wheel to roll out the steer heads and boots to make a trim for both the front of the greeting and to make a stopper for the inside of the easel card.
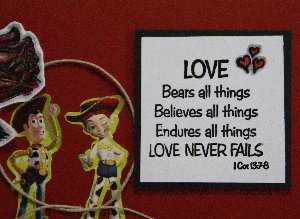
I used a greeting from Stampin' Up's! God's Blessings stamp set (NLA) and also some other sentiment stamps to form the greeting and the inside sentiment, then embossed them in black also and added an embellishment of hearts with my Stampin' Write markers.
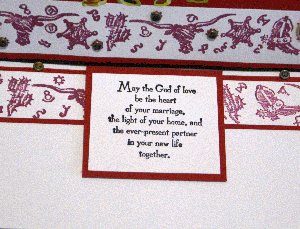
Some antique brads from Stampin' Up! made the stoppers and further embellished the trim.
The linen twine was easy to make into a lariat loop to lasso the two figures, then snake around to form a coil at the bottom. I adhered the coil and the loop with my favourite Tombow glue.
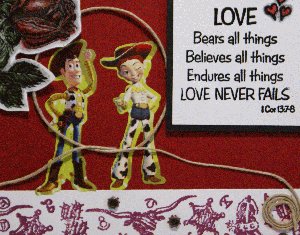
You can see how it all came together. Inside the card I lined it with pieces of Basic White cardstock to provide plenty of room for people to write their names and greetings for the happy couple.
I can guarantee, there would not be many wedding greeting cards like it in the world. Lol! Papercrafters have no worries about buying the same card as someone else buys when they make them up themselves.
Blessings for the newlyweds :)
If you want more wedding card ideas, these pages may help:
Need some wedding theme ideas? This year there are lots of trends.
Return from Wedding Greeting Cards to Special Occasion Cards | Return to PaperCraftCentral Home page


New! Comments
Have your say about what you just read! Leave me a comment in the box below.