- Home
- Papercraft Adhesives
- Wedding Card Project
Wedding Greeting Cards2
Written and Created by PaperCraftCentral Susan
Make your own wedding greeting cards2 enhance a special day
"True love stories never have endings."
~Richard Bach
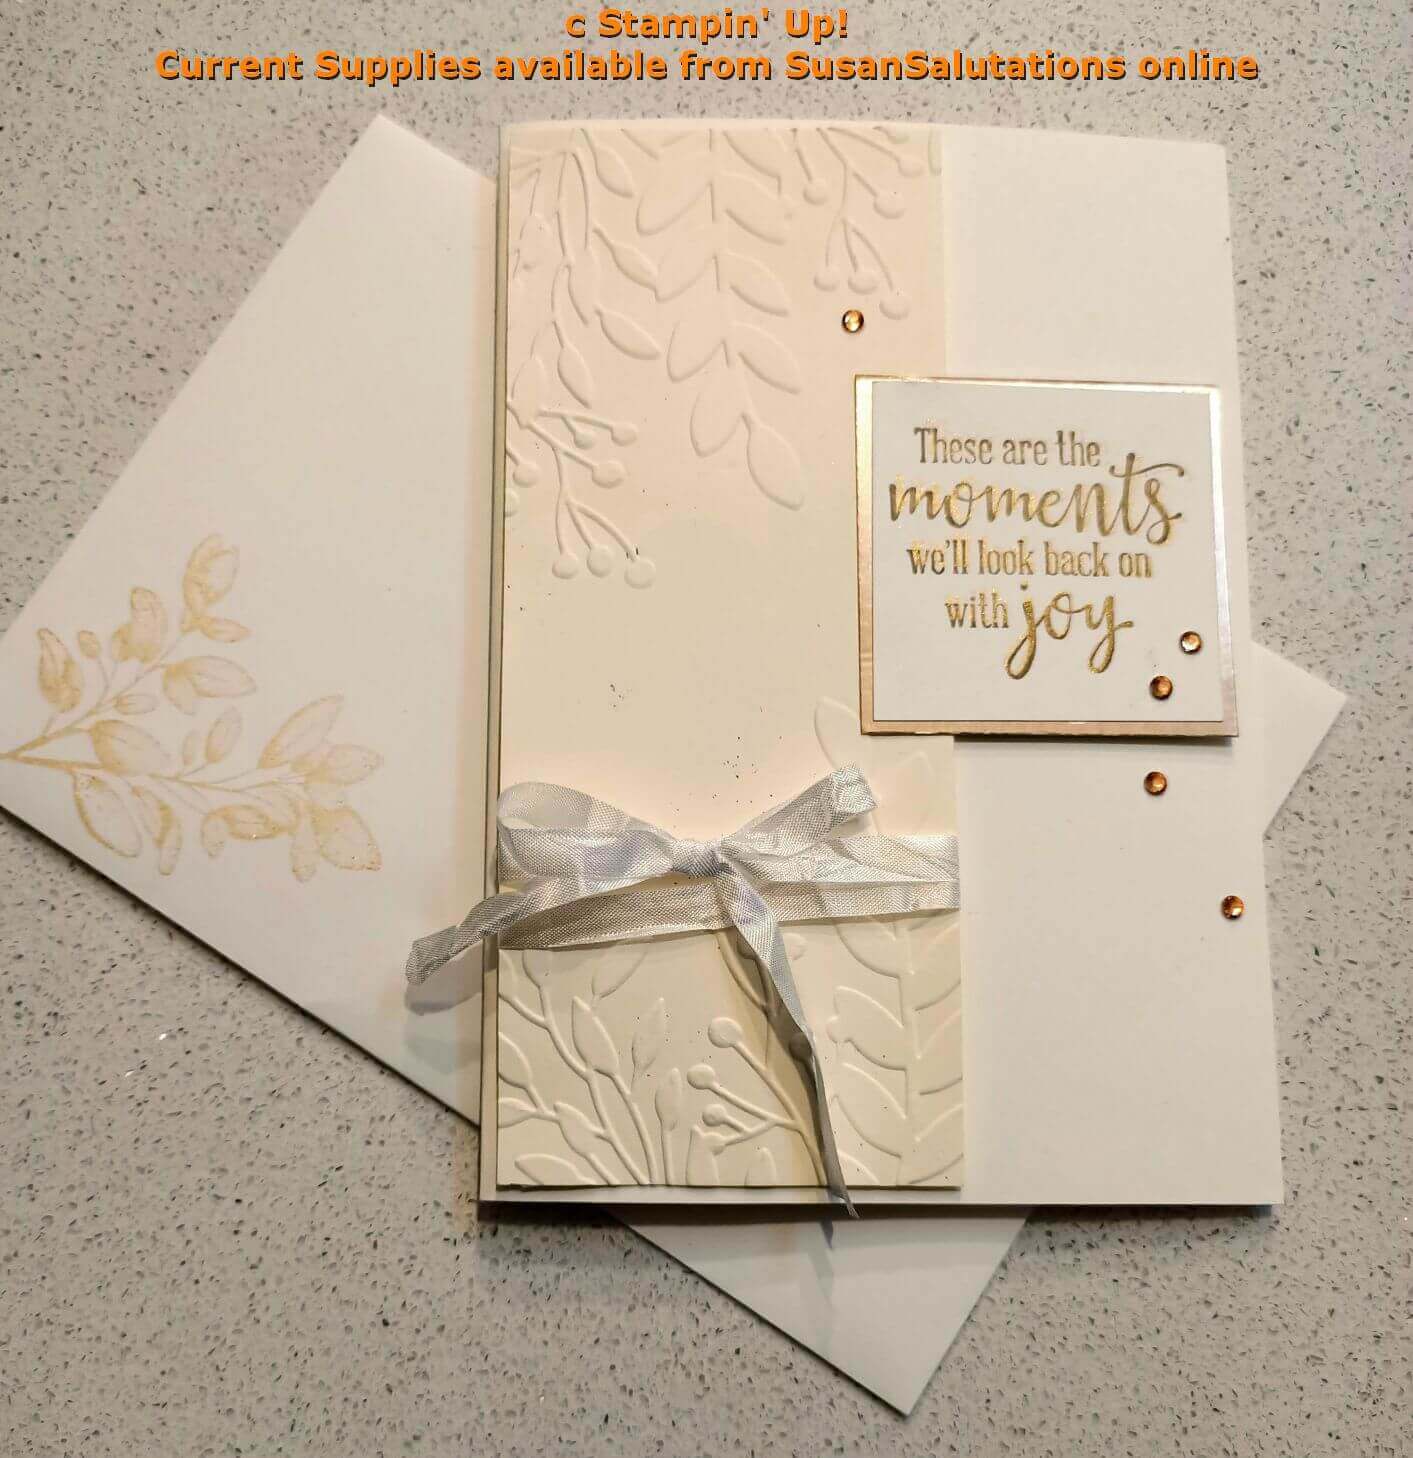
Young friends got married awhile back. Making my own wedding greeting card2 congratulate them was top on my priority crafting list that week. I made a card with products that were available then, but decided to remake the project with newer ones for you before I added it to this page.
I think this new card turned out even better than the first one.
Lately I have been enjoying the use of my Stampin' Die Cut and Emboss machine more and more, so I got it out to play again to make a special project for my friends.

I loved that I knew this wedding would have gold accents in the decor, the bride would be wearing white and her bridesmaids would be wearing cream. That made it very easy for me to choose cardstock to go with her theme.
The groom wore a white suit and his groomsmen were in cream.
The bride wanted ferns in her bouquet and few flowers.
It was a very classic look, very striking.
I was glad to be able to make my card in a similar fashion. Clean and simple is really my style most of the time.
That's a clue for when you make wedding cards for your friends - always consider their tastes and preferences, and see if you have something that will resonate with them in your stash! Well, that's how I do it.
Now I will give you more information about how this card came together.
Wedding Greeting Cards2 Instructions
Here's my Stampin' Up! Supply List:
- Basic White cardstock base (I actually chose thick Basic White) and another piece for the main image
- Very Vanilla cardstock
- Brushed Metallic Gold Specialty Paper
- Stamp Sets: Forever Fern, Peaceful Moments
- Inks: Crumb Cake and retired Delicata golden glitz ink
- Greenery embossing folder (retired) and Stampin' Cut and Emboss Machine
- White Crinkled Seam Binding ribbon
- Champagne Rhinestone Basic Jewels
Here's what I did:
First I ran some Very Vanilla cardstock through my Stampin' Cut and Emboss Machine machine with the embossing folder. I trimmed the element to fit on the left hand side of my card front and popped it up with Mini Stampin' Dimensionals.
Using some of the ribbon, I wrapped it around twice then tied a piece around the Very Vanilla embossed image in a bow.
I stamped my sentiment first in Crumb Cake then in gold ink to create a shadow effect for the text. I think that makes it look almost three dimensional when yu create a shadow for your text.
Then I mounted the sentiment image to the right of the embossed image panel.

Tip: If you wanted to make the embossed image stand out more, you could ink it or turn it over and treat it as I have on this Manhattan Rose element.
Always adapt these ideas I suggest to fit in with what you have in your own stash. You don't have to have the same dies, embossing folders or cardstock to create a similar look.
One more thing - for my wedding greeting cards2 project to be truly finished, I signed on the back that I was the card maker.That way they knew ther card was a one off, a special one create just for their wedding. They also knew I was the crafter.
(If you are selling your cards, do be sure to include a stamp on the back acknowledging Stampin' Up! as the company as this is part of their 'Angel Policy' for their supplies.)
I stamped 'Congratulations' inside and added some fern images.
I made another card as an order for a lady and have featured it on my SusanSalutations blog if you would like to see that. It features its own envelope as it is quite a 3d greeting.
May this wedding lead to a strong and happy marriage, filled with blessings!
PS: If you live in Australia and would like to order any of the supplies I used that are still current, you can check out the items in my SusanSalutations Stampin' Up! Store.

Have you made some nice wedding cards with your papercraft supplies?
If not, do you think you will try out making some now? It can be a little thing that really adds to the unique experience of the day for the bride and groom. I do love to customise my cards to the theme, colours and interests of my recipients. You can too!
If you liked this page, you might like to see these other projects:
- Getting started Making Wedding Cards
- More wedding cards
- Even more wedding cards
Return from Wedding Greeting Cards2 to Special Occasion Cards | Wedding Easel Cards | Wedding Greeting Cards | Return to PaperCraftCentral Home Page


New! Comments
Have your say about what you just read! Leave me a comment in the box below.